How To Be An NFT Artist – Free Content Creation Software
Excerpt from "How To Be An NFT Artist" - Free NFT Creation Software
This article is a chapter excerpt from the book “How To Be An NFT Artist: A Beginner’s Guide To Digital Art”, by Kai Laigo. It is available at Amazon HERE
Free NFT Creation Software
What software is being used to create these visually amazing NFTs? The answer is, it depends on the type of NFT in question, and the artist’s preference. For advanced projects, you may have to use several types of software at different stages in it’s creation. An example would be if you were to create a graphic in Photoshop, and then use Premiere to attach a song and create a music video clip with a static image. For every type of content you wish to create, there are usually several, if not dozens of potential apps that can get the job done.
The following three apps were chosen for a few reasons; The first being their overall utility. Each program, in it’s own regard, is extremely powerful. All three contain a bunch of relevant features, are used by professionals worldwide, and there isn’t too much, if any, overlap between them. The second, and perhaps most important, is each program’s longevity. Blender was born in 1994, Krita was initially released in 2005, and the newest of the bunch, REAPER, has been around since 2006. All three softwares are regularly updated, and have a wealth of free tutorials available online. In addition, they all also benefit from large, growing, and active user bases.
Necessary Hardware
The following three synopses are for the 64 bit desktop versions of these apps. You will also need some external hardware which you may already have, and if not, is inexpensive. To properly use Blender, you will likely need a 3-button mouse. Any old gaming mouse with a middle jog wheel will do. There is a work-around for this (you juts have to enable it in the preferences section menu), it makes the user interface a bit harder to use. For Krita, you will likely have to use a drawing tablet to really get the full benefit. I use a Huion drawing tablet that cost me $40 (current price is $50), and it’s still working great 7 years later. So I’d say a drawing tablet is a good investment, especially if you’re new to digital art. Also if you plan on creating large, dataintense projects, it’s best to use a suitable desktop computer with a good GPU. If you expect your art apps do some real heavy lifting, this will be necessary.
Krita
Krita is a free program for illustration- i.e. drawing, painting, doodling, and even “pixel art”, I highly recommend Krita. I know, I know… Photoshop is sort of the default in this category. While PS may be the most widely used app in this regard, it’s a bit ironic because… it’s not illustration software. As the name implies, it’s a photo manipulation package- but obviously it does a fine job at drawing raster graphics, so people use it for that. Krita does offer some vector graphic support, but it’s mostly a raster program. Being free and open source, Krita has a huge world-wide fan base of artists and developers. It is available for Windows and MacOS, as well as Linux, Android, and Chrome OS
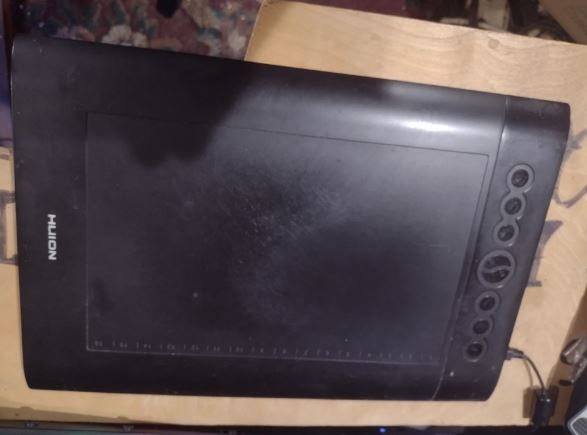
Before I go any further, I’m going to assume that you’re using a drawing tablet. If you are unfamiliar with these, they are USB devices that (when paired with the included digital pen, or “stylus” not shown in picture), give you a flat surface to “draw” into your computer with. Personally, I’ve been using a cheap standard tablet (not a video one) for years. If you don’t have one, definitely get one, as they aren’t that expensive.
What’s it good for?
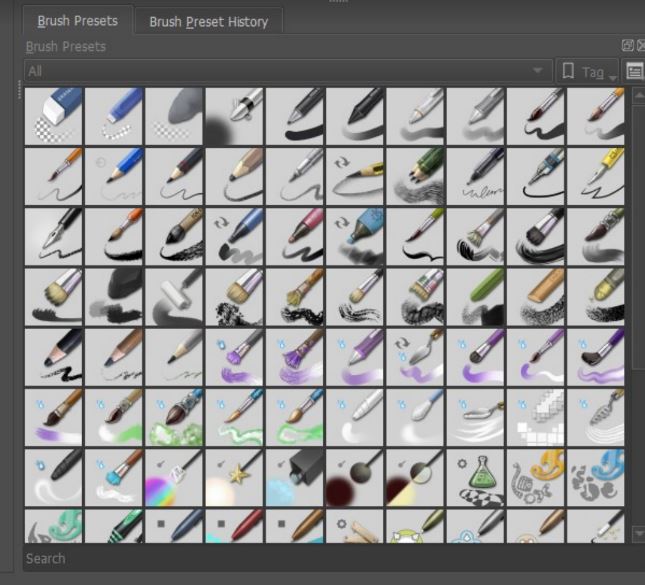
With that said, I have always preferred Krita for anything involving hand drawing. This is because the pen response is much better, faster, and you have more control over the brush properties. The entire brush system, with it’s graphic presets, is also much more user friendly and oriented toward people looking to hand-draw 2D art. This is where Krita really excels, with it’s brush engine and wide variety of brush effects. The brushes each have a graphic icon that basically shows you what kind of brush tip or effect is being used.
The brushes themselves range from simple (like solid strokes, opacity, and size brushes), to “artistic” (like sponges, watercolor, various textures of paint), to the truly exotic.
The Krita interface begins with a blank grey page with nothing happening. You have to first create a “new file”, and choose a canvas size and resolution. At that point, you should see a white canvas space. You can select the brush tool by pressing “B”, and now you’re ready to draw!
Brushes
But first, you might want to look over at the brush presets, and pick something good. After you choose a brush preset, the first thing you want to do is go over to the “Tool Options” tab, and select a smoothing option. You can choose None, Basic, Weighted, or Stabilizer. None, Basic, and Weighted will give you a faster, more accurate stroke response. Stabilizer with give you a much smoother, even looking stroke, but with slightly less control. There are a few other related options, like smoothing distance and stroke ending so you can tailor it to your exact liking. Play with that a bit to get the feel and response right for you. Experiment with some brush presets, and realize that you can click on the “edit brush settings” icon located in the mid-left on the upper most icon bar. There, you can literally edit every possible parameter of your brush. When you get into that section, you’ll see a lot of options, many of which can be controlled by the pressure and rotation of your stylus. You can also create “stamps” which are pre-made drawing, shape, or textures (like a real rubber stamp), but allows you to apply them with a brush stroke. This is great for small, repeating details, like rocks, clumps of grass, etc. Krita even comes with some verty useable stamps included in the brush presets.
Note that there are some extremely useful pixel art brushes included in Krita. Obviously, these are what you want to use if you’re creating in that style. They’re the ones with the pixel-looking icon, like this. These brushes are hard on/off brushes with no mid tones or edge fading, so they’re what you need for single-pixel strokes.
Layers
Don’t forget layers, as Krita uses them in very much the same way PS does. The grouping, masking, and filtering is very similar (though not identical) to the way that Photoshop is set up. If you are even vaguely familiar with PS layers, Krita follows essentially the same logic. If this is all new to you, get VERY familiar with separating your work into various layers- layers for outlines, layers for colors, layers for shadows, highlights, etc. Keep them all separate and well labeled, and your life will be easier. Also, experiment and learn the difference between blending modes and how you can use them in layers as well.
Don’t forget, working within organized layers will be super necessary if you plan on creating a “10,000 collection” of NFTs, which depends on creating hundreds of separate asset layers that all work with each other. I’ve used Krita to create hundreds of asset layers myself for several of these types of collections. As a little aside, here’s some advice when making such a collection; when you think you’ve made enough assets, make more. And then when you’ve done that, make some more to top it off. It takes roughly 200 individual assets to make 10,000 unique composited images. So if you do that, and use the minimum amount of assets (200), you’ll probably end up looking at your unique images afterwards, and think “I wish there was a bit more variety”. So my advice is, if you’re doing a “10,000” collection- go ham and make as many layers as you possibly can. It might be possible to do with 200 assets, but shoot for 300 or more.
Animation
Here’s where Krita gets really exciting. It also features some great tools for traditional cell animation. Yes, this is “frame by frame” drawing, and there is no interpolation or “tweening” possible between frames. In other words, you’re going to have to draw each frame, just like they did animation in the old days. This isn’t a bad thing, necessarily. If you’re going for that “old school” animation look and feel, this is how you do it. The animation function centers around a horizontal timeline that also shows your layers going vertically. So you have something of a frame-by-image grid that actually works very intuitively. This makes things like walk-cycles very easy to copy, paste, and move around. There are even advanced animation features like animated brushes, which can cycle a predetermined sequence of stamps, patterns, or strokes, with your brush strokes. This can make repetitive things like animating hair or cloth movements extremely easy.
Blender
Blender is free, open source, 3D creation software. It is used world-wide in the creation of 3D animation, art, visual effects, and gaming assets- and much more. This is an insanely powerful tool. It’s been said that if Photoshop is a fancy car, After Effects is a helicopter, and Premiere is a jumbo jet… then Blender would be the Starship Enterprise. Blender in my humble opinion, probably gets used for NFTs more than any other single software title. The other apps mentioned here (Krita and REAPER), certainly do get used in NFTs, and content creation in general, but they both pale compared to how much Blender actually gets used in making many types of NFTs. But I’d be willing to bet that a large percentage of the NFTs you’ve actually seen yourself, were created or partially created in Blender.
Blender is so deep, with so many functions and features, that it’s hard to know where to start. Generally, it’s used for 3D art applications. This ranges from 3D character animation (like Pixar), to photo-realistic product shots and videos, to creating photo-realistic portraits and models (meta humans and deep fakes). It’s also used for abstract 3D art and animation, such as the type of art you might see Beeple create. The built-in physics modeling lets you create things like object interactions, cloth, fluids, fire, etc. There is also a “grease pencil” function that essentially allows you to use blender as a 2D art tool. You can also go in a completely different direction with blender and use it for Hollywood style VFX and motion tracking, or for editing and compositing video. It can even be used for scientific modeling.
My advice would be; learn Blender now, and learn it fast. Expect the learning curve to be intense, but the time spent learning this software will pay off greatly. I say this because, just about everything you see “succeeding” in the NFT space, and most things that will do good on the future, are going to be things that can be created in Blender. Every 3D mutant/ape/punk/copycat character you see? It could have been made in Blender. If you want to have a future in digital art, and making appealing and popular NFTs, then Blender is your tool. Especially if you have more enthusiasm and time than money… then Blender is definitely your tool, as it’s free!
Do realize that Blender is so packed with features, that it will almost certainly seem overwhelming at first. There are features within features, and it’s really easy to do one thing wrong, or out of order, and have something go wrong. Before you jump into Blender, I’d suggest deciding on what you want to do with it, and what kind of content you want to create. This will help you learn the aspects that are relevant to your goal, without wasting time on functions you won’t use.
Even within the world of 3D art professionals, people usually focus their skill set on specialty, as opposed to being a 3D art generalist. This means that some people get good at modeling and sculpting characters, while others excel at building 3D materials and textures. Some might focus on creating still images and photo-realistic renders, while others work exclusively on animation, key framing, and motion graphics. If you are entering into this with an end result in mind, it’s probably a good idea to find out specifically what 3D techniques are used to achieve that, and focus on developing those skills.
Navigation
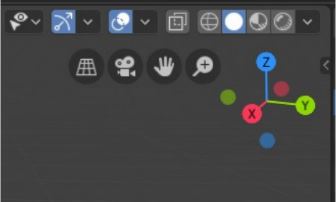
When Blender starts, you will see a gray 3D grid world, along with the infamous default cube in the center of your x/y/z/ axis, along with a default camera and light. You can left-click on any of these objects to select them. You can navigate around the scene in three dimensions by holding down the middle button of your mouse (the jog wheel), and moving the mouse. If you want to move in two dimensions (only left/right or up/down), and maintain the same angle, you can hold down shift, then hold down the center mouse wheel and move the mouse. If you’d like to zoom in or out, then hold down control, then hold down the center wheel and move the mouse. Alternatively, there’s a RGB X/Y/Z axis in the top right. If you grab that with your left mouse button and drag it around, it will also drag the scene around.

Navigation is really everything in blender, as weird as that is. Further, you can use the num pad (NOT the numbers above your QWERTY keys!) to switch between view presets. Press 1, and you’ll get a head-on view. 7 is a bird’s eye view. 3 is a profile view. 9 will reverse the view to the opposite side. These are useful, because each of these is lined up perfectly in 2D, so you can see any changes you make more accurately. It’s easy to, for instance, move something in a slightly skewed 3d view, and think you’re moving something in two dimensions while it’s really moving in all three. Use the views in the number pad, and save yourself the frustration.
Editor Type
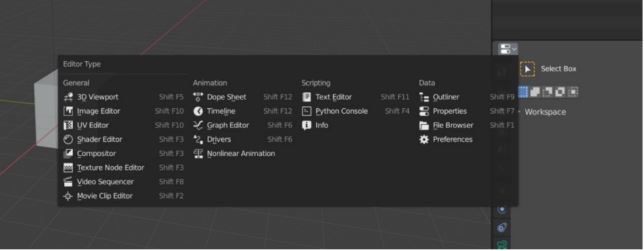
The individual windows in the Blender UI are called “Editor Types”, and if you click on the icon in the top left corner of each separate window, they can be changed to a different editor type. By default, in the top right, you will see the Outliner, which is a list of all objects in your scene. These can be grouped into “collections”, which can then be collapsed, expanded, and organized in the Outliner.
Properties
Tabs Below the Outliner, you will see the properties viewer, which will display the properties that correspond with the colored vertical tabs on the side. Here you have your main properties, from active tool and workspace settings, to your textures tab on the bottom. This collection of tabs is the “meat and potatoes” of the Blender UI, as most things at some level will be accessed through this panel. Click through the different colored tabs, stacked against the window vertically. They contain everything from materials, textures, physics, particles, modifiers, etc. You will also notice that new tabs will appear if certain objects in the scene are selected. For instance, if you select a light, you will see a lightbulb tab appear, in which the light’s properties can be changed. This is also true for the camera that is already in the scene by default. Click on that, and you will see a movie camera icon, where you can change the focal length and other parameters.
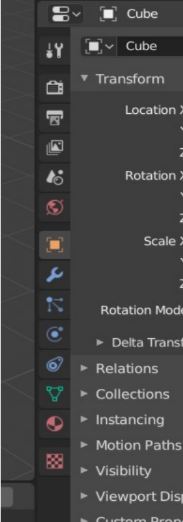
Blender Modes Right now in Blender, you’re in “object mode”. You can select the cube, press the G button, and use the mouse to move it around. Similarly, you can use the S button to scale it up or down. If you hit the TAB key, you will go into edit mode. Here, you can manipulate the individual points (vertices), edges, and faces of your cube. Hit TAB again to go back into Object mode.
Any further instruction really depends on what you’d like to do. I would suggest exploring YouTube, as there are a huge amount of Blender tutorials on how to make just about everything. Search “Blender 3D” if you get to many food-processing results. Also, a bit of a pro-tip here; you don’t need to be a 3D modeling god, to look like one. There is a thing called “kitbashing”, where you essentially buy pre-made Royalty free 3D models from other artists, and use them in your own scenes and creations. Please keep in mind I am talking about royalty free 3D models, which are usually something you purchase, but there are free models available as well. There are several online markets where you can buy 3D models and assets, and they’re not terribly expensive. Keep in mind that the usage rights are not always “royalty free”, so be aware of what models you are using and how you are using them.
I should also point out that kitbashing is pretty commonplace among NFT artists, and I assume it is with the big ones as well. I don’t know for a fact, but I suspect that artists like Beeple use kitbashing a lot, along with huge amounts of their own style and re-working. Having a library of pre-made assets (regardless of if you paid for them or made them yourself), is how you can make a really cool “everyday” render along with other artwork on top of it. It’s just a time management issue.
The thing to take away, is that “kitbashing” is literally the idea of taking different pre-made 3D models and “bashing” them together. This can be as creative as taking the basic geometric shapes of nuts and bolts, and combining, scaling and extruding them into a spaceship. Or you might simply take various modeled buildings and structures, and combine them into a virtual 3D compound or castle. You are only limited by your own creativity and imagination. If you don’t really know where to start with Blender, download some free models that inspire you, and start messing with them. Change the colors, change materials, edit the model itself. Watch some tutorials and see what is possible.
REAPER
Reaper is a bit different from the other two entries here, as it’s not a graphic program at all. It’s a DAW, or “Digital Audio Workstation”, which is software for recording audio. Specifically multi-track audio, so it’s very similar to software like Pro-Tools. REAPER is fantastic software for recording and producing music. Why would I recommend this? Well, for a few reasons…
Sure, visuals rule the roost when it comes to NFTs- they’re high up there, you see them first, and they’re just sort of too obvious to miss. But audio is way more important than you realize, and is a seriously untapped part of the NFT space. You could be monetizing music, exclusive episodes of a podcast, bits of conversations, voice-mails, sound design, samples… any of these could easily be in-demand NFTs. Beyond that, if you’re “creating content” in a more traditional sense, whatever that is, you’re probably also going to need audio be it in the form of a sound track, score, narration, sound effects, etc. Also, a lot of musicians have been asking about musical NFTs, and yes… they are here, and they’re only going to get more ubiquitous. In that context, REAPER is something that might come in handy in a variety of situations and circumstances.
Note – REAPER is not free, but… the catch here is that it’s totally free. Let me explain. REAPER does indeed cost $60 for a personal, single-user license. However, it also comes with a full-featured free trial period. This “free trial” never actually stops working. If you read the fine print, it says that REAPER gives you a 60 day trial period, but you can take longer if you want, so actually the trial period never expires. They just ask you to pay for it if you like it and continue to use it. It’s basically an honor system thing. If and when you do decide to pay for the license, nothing special happens. You don’t get any more features. It’s functionally the same program that it was before you bought it. If any of this sounds bizarre to you- you’re not wrong. Real kindness is rare these days. The creator of REAPER is a major philanthropist, and seems more concerned with making the world’s best, most stream-lined DAW app than he is making a lot of money from it.
Getting Set Up And Recording REAPER stands for “Rapid Environment for Audio Production, Engineering, and Recording. After you download and install it, you’re going to open it, and it will probably immediately send you an error message about “not finding an audio interface”, or some nonsense. You will need to go into REAPER’s preferences, and under the “Device” tab, choose a range of audio inputs from whatever interface or sound card you have connected. If your audio interface is new, you may at this point have to download an audio driver, or that may happen automatically. Depending on the driver’s installation, you may have to restart your computer, or quit and relaunch REAPER. After you’ve successfully installed your audio drivers, and perhaps re-launched REAPER once or twice, the program should now “see” your audio interface as a potential input in the Device tab, where you can select your interface’s inputs and output range if you haven’t already. Here, you can also hit the button on the bottom labeled “ASIO settings”, to choose an appropriate buffer size, latency compensation, etc. After doing that, close the preferences window and you’re almost ready to record.
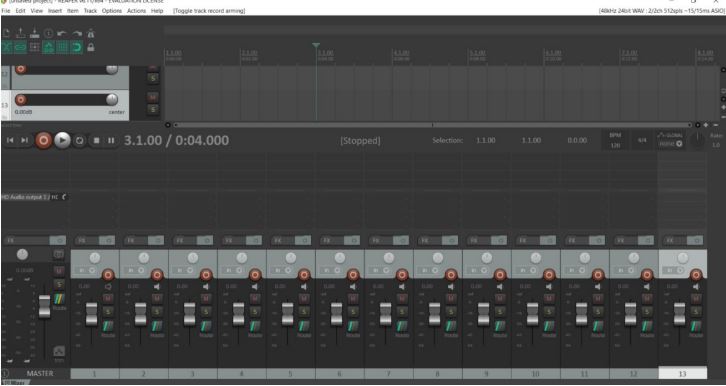
Looking at the main window, you should see your empty timeline in the top section. Below you will see the mixer window, and in between the two you will see the transport control bar. On the bottom left of the mixer window, you will see the master track fader. If you hit CTRL + T, then you will see a new track appear next to the master track. You will also see the new track appear in the top left of the timeline (subsequent tracks will stack underneath it vertically). You can CTRL + T for every new track you may need. At the top of the new track in the mix window, you will see the word “in”. Click on this, and navigate through the sub menus options to choose your desired input. Next to that, you will see a round, red button near the top of the fader. Press this so it lights up. Perform an audio check (playback, speak into your mic, etc.), and confirm that you are getting signal to the armed track in REAPER. If so, you will see the lights on the volume meter next to the track go up vertically. If so, you are now set to record! When you are ready, hit the large red record button in the transport section. You can hit the space bar to stop recording.
To add effects to the track, hit the button that says “FX” above the “in” button. You should see a pop-up window with a list of your pre-installed effect plugins. These are extremely useful, and range from basic Eqs and compressors, to more advanced distortion and filtering tools. Of the three programs mentioned here, REAPER is the one I am the most familiar with. Features such as the actions list, item FX, and take management, are features I use often. The simplified editing and user-friendly design make it high on other people’s lists as well. The biggest drawback to REAPER would be it’s lack of (some) native effects. This may or may not matter, and for some would even be seen as an advantage. It does come with a lot of native plug-ins (which I previously mentioned), but in keeping with REAPER’s ethic, these plug-ins are (visually) totally bare. They all employ a “no unnecessary graphics” aesthetic in order to make for a smaller, “no-bloat” app (the install file for REAPER is 14MB). The thing to keep in mind is, the essential plug-ins provided (EQ, compression, reverb) are all professional, useable, and not bad in any way… they just don’t look fancy. Along with that, REAPER does not include any significant VSTi, virtual instrument, or “synthesizer” plug ins. This can understandably a deal-breaker for those who are looking to produce synth-based music, like synthwave, EDM, hip-hop, etc. However, I produce those types of music too, and I still prefer that REAPER comes without these plug-ins pre-installed. The reason is, I already have all those effects in the form of third party plug-ins I bought separately. Since I’m going to use these other plug-ins anyway, it’s actually convenient that my DAW has fewer and less-obtrusive stock plug-ins. If audio is your thing, and you need a program to record music, narration, podcasts, voice acting, etc. I really can’t recommend REAPER enough.
Honorable mentions:
There are so many other programs and apps that can create professional graphic art, music, and video, that to list them all would be way beyond the scope of this section. This is just a few of the more well-known applications, and what they are commonly used for.
PREMIERE – Adobe’s long running video editing suite. This program allows you to arrange your video clips before editing and arranging them on a timeline. It also lets you “stack” audio and video in vertical layers. A very high-end non linear editing program that is also an industry standard.
Other Video Editors: Premiere, MAGIX Video Pro, Vegas, Final Cut, DaVinci Resolve Budget Video Editors: Vegas Movie Studio, Premiere Elements, Movavi Video Editor Plus, VideoPad
Other 3D Software: Maya, Autodesk, After Effects, OpenToonz
Other DAWs: (Digital Audio Workstations) – Reaper, Pro-Tools, Ableton, Studio One, Logic, FL Studio
Final Word On Software If I had to get good at one program, and making NFTs was my goal, I would spend my time learning Blender and getting very proficient in it. There are a huge number of Blender tutorials on line, and free on YouTube. One thing to keep in mind if you decide to learn Blender from scratch, is that the program itself has developed and changed a lot over the years, and older tutorials sometimes can’t be followed exactly since the features and UI may be different in newer versions of Blender. BUT BE WARNED: Blender is deep. Deep like the ocean. The learning curve is steep. There are simply so many options, features, and functionalities in Blender, that most people don’t really learn “all of it”. While a generalist approach is actually a good approach for an NFT artist, most Blender users tend to specialize in one or two aspects, i.e. sculpting, modeling, texturing, animating, motion graphics, motion tracking, etc.
There are tons of other software available, and IMO, competing software products that essentially do the same thing are usually interchangeable. For instance, if you had to choose a DAW (digital audio workstation) to record a musical track, it’s really a matter of personal preference. At the end of the day, they all do more or less the same thing. You could literally use any of them to record the same song, and the end result would be identical. Most times, the specific app being used is much less relevant than the users skill and familiarity with it.
